Installing ESPHome Manually
WARNING
Python 3.14 is not yet supported. Please use Python 3.11, 3.12, or 3.13. Python 3.14 introduced breaking changes that ESPHome’s dependencies have not yet adapted to.
Windows
Section titled “Windows”Download Python from the official site. Use Python 3.11, 3.12, or 3.13.
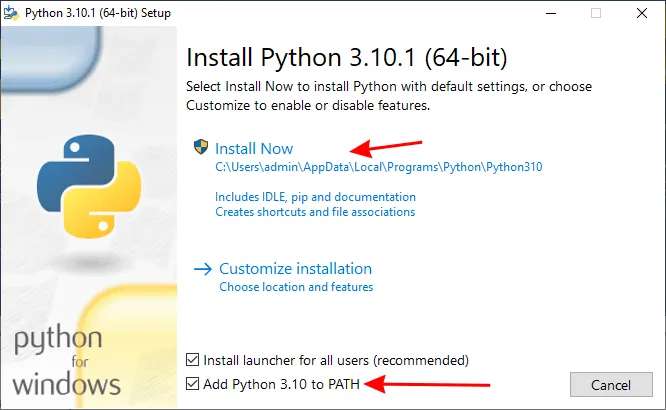
Make sure you check “Add Python to PATH”, and go all the way through the installer.
Log out and back in, or restart your computer. Whichever is easiest.
Open the start menu and type cmd. Press the enter key.
In the terminal that comes up, check that Python is installed:
python --versionIt should show something like:
Python 3.11.13Looks good? You can go ahead and install ESPHome:
pip3 install wheelpip3 install esphomeAnd you should be good to go! You can test that things are properly installed with:
esphome versionIt should show something like:
Version: 2025.8.0NOTE
You may additionally need to install git for the external components feature. Download git from the official link
ESPHome supports macOS. There are several ways to install ESPHome on macOS:
- Homebrew
- pip
- Cloning the repository
Homebrew
Section titled “Homebrew”An easy way for installation is via Homebrew:
brew install esphomeVerify the installation:
esphome versionIt should show something like:
Version: 2025.8.0NOTE
-
If you encounter any issues with Homebrew installation, please check the ESPHome Homebrew Formula page for additional information.
-
Homebrew may not always provide the latest version immediately. Updating Homebrew will automatically update ESPHome. If this is ok for you, Homebrew is the easiest way to install ESPHome.
For the latest version, use the pip installation. This may be more difficult to set up and may need additional dependencies and path settings. Setting up a virtual environment is highly recommended. If you are not familiar with Python virtual environments, Homebrew may be easier.
You will require Python 3.11 or newer. While your Mac may have a version of Python installed it may not be up-to-date. Python can be installed from the official site or with Homebrew. Once Python is installed, create and activate a virtual environment and install ESPHome with pip:
$ python3 -m venv venv # The last argument is the folder in which to install the virtual environment$ source venv/bin/activate # For bash or compatible shells. If using a different shell, use activate.csh or activate.fish(venv) $ pip install esphome # Installs ESPHome in the virtual environment(venv) $ esphome versionAny time you want to use ESPHome, you will need to have activated the virtual environment as shown above.
When activated you will see (venv) at the beginning of your prompt.
Cloning the repository
Section titled “Cloning the repository”For development purposes, we recommend cloning the repository. See our developer site for more information on setting up a development environment.
Your distribution probably already has Python installed. Confirm that it is at least version 3.11:
python3 --versionIt should show something like:
Python 3.11.13Looks good? Now create a virtual environment to contain ESPHome and it’s dependencies.
python3 -m venv venvsource venv/bin/activateYou may or may not see (venv) at the beginning of your prompt depending on your shell configuration.
This indicates that you are in the virtual environment.
You can go ahead and install ESPHome:
pip3 install esphomeCAUTION
Don’t use sudo with pip. If you do, you’ll run into trouble updating
your Distro down the road.
For details, see DontBreakDebian.
pip install is equivalent to make install in this context. The
advice in the article applies to all Linux distributions, not just Debian.
Some people install ESPHome without the virtual environment, which can lead to issues with PATHs etc.
Installations without venv are considered not “supported” as people end up having to know your exact system setup.
At this point, you should be able to confirm that ESPHome has been successfully installed:
esphome versionIt should show something like:
Version: 2025.8.0If you get an error like “Command not found”, you need to add the binary to
your PATH using export PATH=$PATH:$HOME/.local/bin.
To set this permanently, you can run echo 'export PATH=$PATH:$HOME/.local/bin' >> $HOME/.bashrc, then log out and back in.